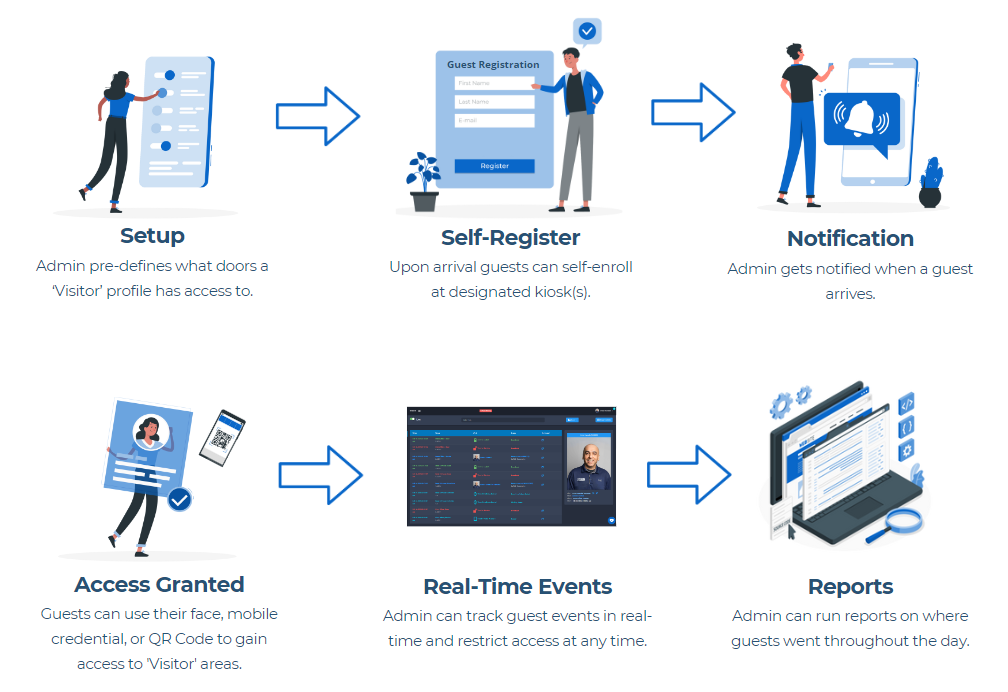
How it Works
- A Guest can register at pre-defined locations using any IP-connected device (ie tablet, phone, desktop, etc...) or a Guest can receive an email with a link to the registration form.
- During the Guest registration, the Guest will input their first name, last name, email, phone number, and take a selfie.
- Upon clicking submit the Guest is assigned a pre-configured Personnel Template and based on that template will determine what doors the Guest will have access to.
- The Guest will get a QR Code emailed to their phone and will be automatically registered at the SAFR SCAN face authentication readers.
Accessing Guest Pass Configuration
- Login as an Admin and expand the Configuration menu on the left side.
- Under Configuration, click on the Guest Pass item.
Interface Configuration
- Check the Enable Guest Kiosk to enable Guest Kiosk Mode.
- Enter the Kiosk IP address(es) that the Guest Kiosk will be accessed from. Multiple addresses can be entered by using a comma as a delimiter.
- Select a Personnel Template that will be assigned to the Guest when they check in. Personnel Templates can be defined in Personnel Manager.
- Enter the Welcome Text that will appear in the Guest Kiosk when the visitor arrives and turn the option ON for it to display. If the option is off, then the text will not display.
- Add a Welcome Logo that will appear in the Guest Kiosk when the visitor arrives and turn the option ON for it to display. If the option is off, then the text will not display.
- Set the Guest Kiosk interface to display in Dark Mode with the option ON or Light Mode with the option OFF.
- Set the Guest Kiosk interface to display the forms as multiple forms with fewer inputs with the option ON, or a single form with all input fiels when the option is OFF.
Functions Configuration
- Print Guest Pass to a printer when the option is turned ON. Printed pass will use the Visitor template that is defined in the Badge Designer.
- Auto Check-in will generate an Access Granted event for the Guest at the defined Check-in Reader. This event can be used to track time and attendance along with determining occupancy from the Occupancy Control module.
- Require NDA will require the guest to agree upon the uploaded text/html file before checking in.
- BOLO Check will check to make sure that the guest is not listed as one of the names in the uploaded html/text file. Names in the text file should appear as First_Name Last_Name with an optional middle initial. Names can be delimited but it is not required. The only requirement is that the First Name and Last Name appear together with a space between them. BOLO Check must be turned ON and have a valid text file uploaded.
- Email Bolo Alerts to will email the address entered when a guest's name matches the name in the BOLO list.
Guest Kiosk
- Access the login page from any location of the pre-defined Kiosk IP address(es).
- At the login screen, you will notice a Guest Kiosk Mode link at the bottom, that will navigate to the Visitor page.
- Visitors can now use the system and register themselves from this Visitor page.
- Once registered, a personnel record will get generated for the Visitor and they will be assigned to the pre-defined Personnel Template.
- If the Personnel Template contained Access Levels, then the Visitor will have access to those doors by using the QR Code that was emailed to them and/or their face using the SAFR Scan reader.
Email Guest Registration Form
- To email a guest the guest registration form, access Personnel Manager.
- From the Commands menu click on Email Guest Registration Form.
- Enter the guest's email address and click on Send Email.
After the above steps have been performed, the visitor will get an email with a link to the Guest Registration Form, where they can enter their name, phone number and take a selfie. Once registered, they will be able to access the facility at the designated readers that have been pre-assigned to their Personnel Template, using either their face or QR Code.