Overview
The typical configuration of a Mercury controller on a network is for the controller to act as an iterative server. In this manner, the driver (host server) initiates the connection to the controller. This configuration, known as "IP Server" in the "Connection Type" field (Host Communication page) on the controller's Configuration Manager web setup pages, is well suited for controlled networks without firewalls between the host application server and the controller. Follow the steps below to configure a Mercury controller to use IP Server to connect these controllers to a remote Server
Prerequisites:
The following information and settings are required to use IP Server for Host Communication:
- Security management software version 10.9.94 or higher
- TCP port opened on the firewall, by default it is port 3001
- TCP/IP Network settings on the controller to include IP Address, Subnet Mask and Default Gateway
- Public IP address of the Server hosting the Mercury Driver
- Port Address Translation in the network firewall. Each Mercury Controller will require a port address translation (PAT) to communicate out of the internal network back to the remote Server
I. Configure PAT (port forwarding) on you network firewall device
- 1. Login to your network firewall appliance
- 2. Create a port forwarding rule for each controller to talk out of your network to the remote Server, for example:
External IP Port Internal IP Port Controller Internal IP 3001 3001 192.168.1.101 3002 3001 192.168.1.102 3003 3001 192.168.1.103 - 3. Consult your network administrator to set up the port forwarding rules on your firewall.
II. Configuring the Controller for IP Server Host Communication
- 1. Login to the controller's Configuration Manager webpage
- 2. Click on Host Comm
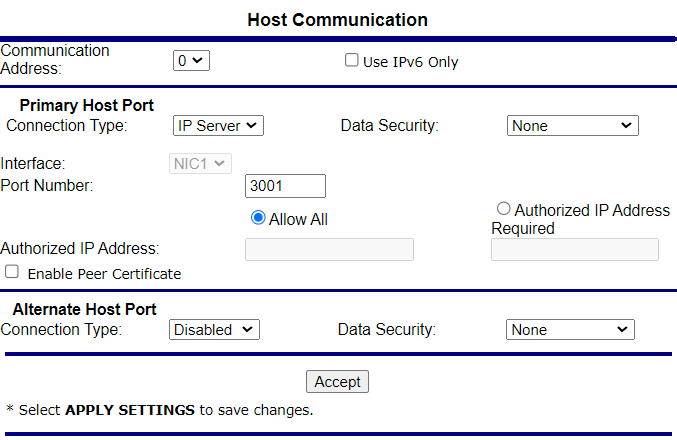
- 3. In the Host Communication page, under Primary Host Port, set the Connection Type to 'IP Server', Data Security is 'None', Port Number is '3001' and Allow All is selected.
- 4. Next, click on the Accept button
- (see below example:)

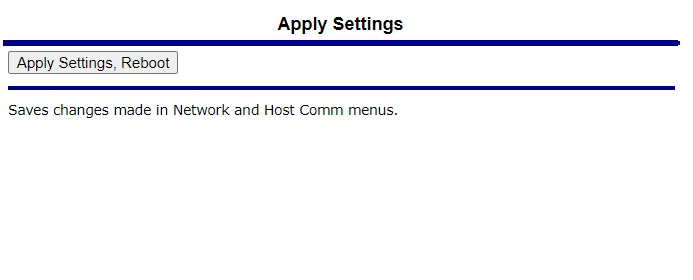
- 5. Next, back in the Configuration Manager webpage, click on Apply Settings
- 6. In the Apply Settings page, click on the Apply Settings, Reboot button
- (see example below)

II. Configuring the Controller to connect to the Host Server
- 1. Login to Web client
- 2. Go to Configuration > Hardware Manager
- 3. In Hardware Manager, select the Mercury Driver to expand the controller tree
- 4. Select a controller
- 5. In the Controller property window, configure the following values:
- a. Connection Type: 4- Network (IP Server)
- b. Channel Port: enter the External port that this controller was translated in the network firewall appliance
- c. IP Address: enter the public IP address of the controller's network
- 6. Click Save
- 7. Repeat Step 5 for all the other controllers, making sure to only change the 'Channel Port' to the correct External port number that was translated for that controller. The Connection Type and IP Address property should be the same
- 8. After all the Controllers have been configured for IP Server, Stop the Mercury Driver and then Start the Mercury Driver
